How to Remove Soap Scum from Glass Shower Doors

I remember the exact moment I realized my shower doors had gone from “a little cloudy” to full-on embarrassing. My sister-in-law came to visit, used the guest bathroom, and very politely said, “Hey, do you want me to help you clean up a bit before your mom arrives?” She was talking about the shower doors. They looked like someone had rubbed a candle all over them and then let it dry for six months.
That was my wake-up call.
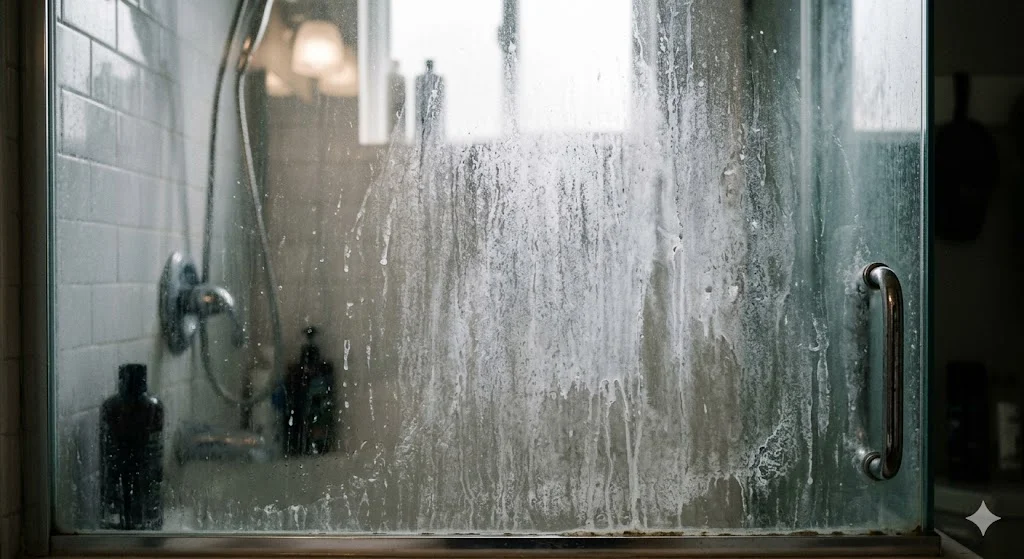
I had been wiping them down occasionally, spraying some generic bathroom cleaner, and calling it good. What I didn’t realize was that soap scum doesn’t just sit on the surface — it builds up in layers. Each shower adds another thin film of soap, minerals, and body oils. Over time, that invisible film becomes a foggy, grimy coating that regular cleaning spray simply can’t touch.
If you’re in that same situation — staring at glass doors that look permanently dirty no matter what you do — you’re not imagining things. And you’re definitely not alone. This is one of those cleaning problems that sneaks up on everyone eventually.
Let me walk you through what I’ve actually tried, what flopped, and what finally made my shower doors look genuinely clean again.
Why Soap Scum Is So Stubborn in the First Place
Before you can fight something, it helps to understand what you’re dealing with.
Soap scum is a chemical reaction, not just dirt. When the fatty acids in bar soap mix with the minerals in hard water — things like calcium and magnesium — they form a new compound that bonds to surfaces. It’s almost like a very thin layer of mineral cement. That’s why scrubbing with a sponge and some dish soap does almost nothing. You’re essentially trying to wash away something that has chemically attached itself to your glass.
If you have hard water (which a huge portion of homes do), the problem is even worse. The mineral deposits pile on top of the soap scum, creating a double layer of stubborn residue. You might also notice white or gray crusty spots — that’s limescale, and it’s a separate but related problem that comes with hard water.
I found this out after trying three different “bathroom cleaning” sprays from the store and getting almost zero results. It wasn’t that the products were bad — it was that I was using the wrong type of product for the job.
The Products and Tools That Actually Work
Here’s what I’ve used and tested over the past few years. Some of these surprised me.
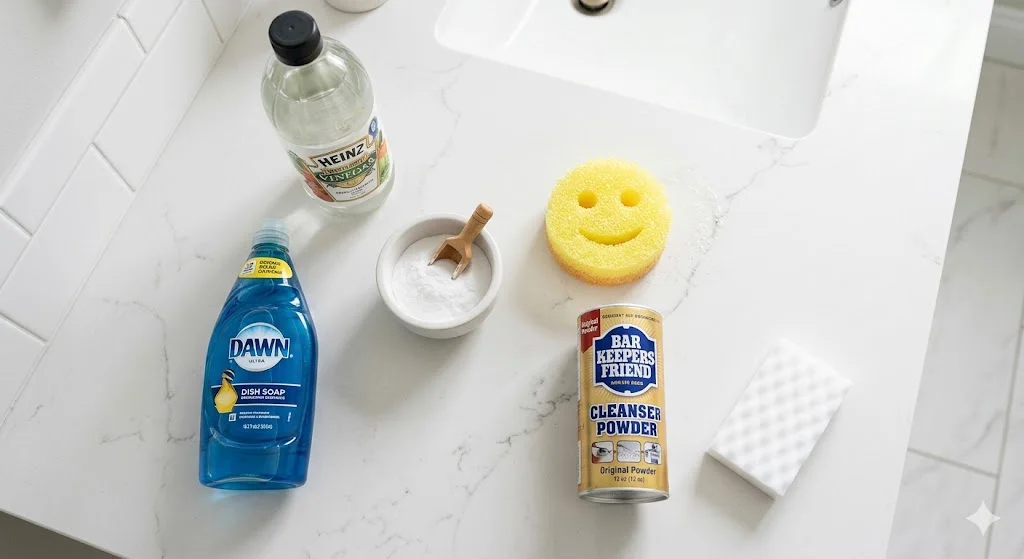
White vinegar is the starting point for most soap scum situations. It’s acidic, which means it breaks down the alkaline mineral deposits and soap residue. Plain distilled white vinegar, undiluted, applied directly to the glass and left to sit for 10 to 15 minutes — that’s where you start. I heat mine slightly in the microwave (not boiling, just warm) because warm vinegar penetrates better. Use a spray bottle for easy application.
Dish soap and vinegar together — specifically Dawn dish soap — became my go-to combo for moderate buildup. Mix equal parts of each, put it in a spray bottle, shake gently, and spray it on the doors. Let it sit. The dish soap cuts through the greasy layer while the vinegar handles the mineral deposits.
Baking soda works as a gentle abrasive. Make a paste with a small amount of water and apply it with a non-scratch scrubbing sponge. This is great for the really stubborn spots that vinegar alone doesn’t fully clear. I use a Scrub Daddy sponge for this — it’s firm enough to scrub but won’t scratch glass if you use light pressure.
Bar Keepers Friend (the powder version) is the heavy-duty option. I was skeptical about this one because it feels like a product from 1952, but it genuinely works on glass. Wet the surface, sprinkle a small amount, and use a damp sponge in circular motions. This stuff removes even old, thick soap scum buildup. Rinse it off completely before it dries because it can leave its own residue if you’re not careful.
Magic Eraser (Mr. Clean) is surprisingly effective for light-to-moderate scum and watermarks. Wet it, squeeze out the excess water, and use gentle pressure in circular motions. Don’t use it on anything other than glass — it can scratch softer surfaces.
Step-by-Step: How I Clean My Shower Doors Now
This is the routine I’ve settled into after a lot of trial and error. It takes about 20 to 30 minutes for a thorough clean, and I do a maintenance version every week that takes maybe five minutes.
Step 1: Rinse the doors first
Start by running the shower briefly to wet the doors, or just spray them down with plain water. You want the glass wet before you apply anything. This helps products spread evenly and starts loosening the surface layer.
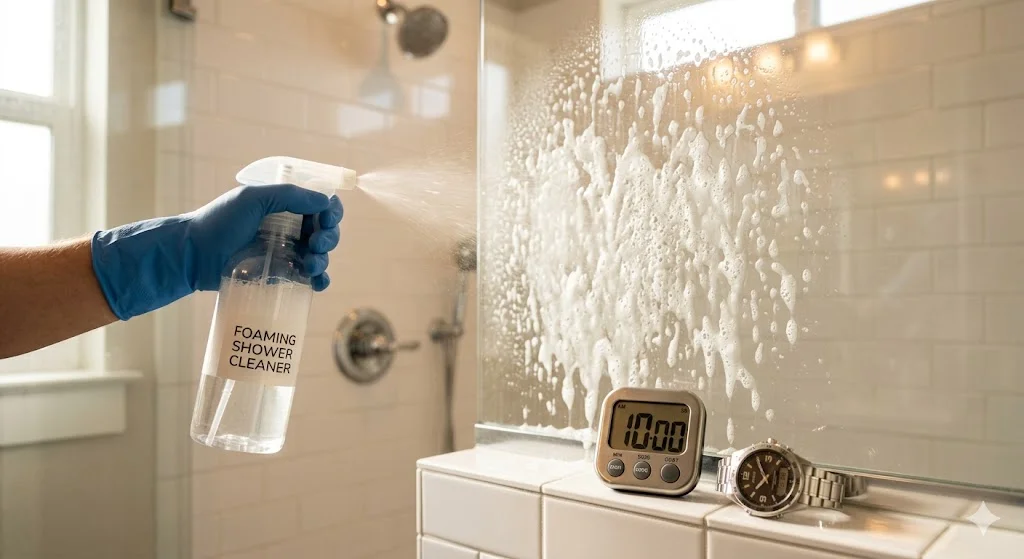
Step 2: Apply your cleaning solution
For regular buildup, I spray the warm vinegar and Dawn mixture all over the glass. For heavy buildup, I skip this and go straight to a Bar Keepers Friend paste or a thick baking soda application. Cover the entire surface, including the metal tracks and frame, and don’t forget the bottom edge where scum tends to collect most aggressively.
Step 3: Wait (this is the step people always skip)
Let the product sit for at least 10 to 15 minutes. For really stubborn scum, I sometimes leave it for 20 minutes. This is the step that makes the biggest difference. The product needs time to break down the bonds holding the scum to the glass. If you wipe it off right away, you’re only getting the surface layer.
Step 4: Scrub in small circular motions
Use your sponge or scrubber and work in small circles. Don’t scrub in long up-and-down strokes — circular motion covers more surface area and works better on bonded residue. Apply moderate pressure but don’t go aggressive enough to risk scratching. Let the product do the work.
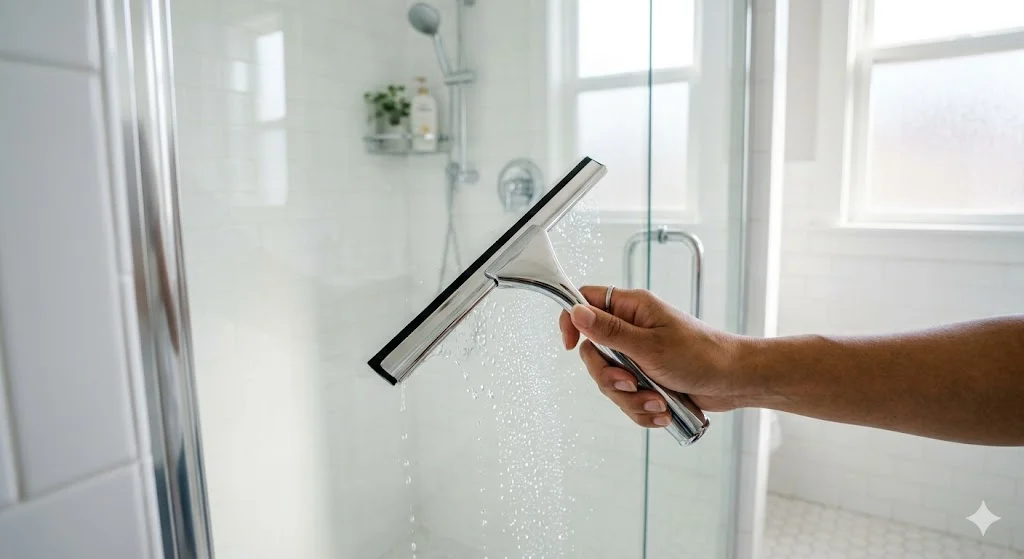
Step 5: Rinse thoroughly
Rinse the doors completely with warm water. Use a squeegee to wipe the water off immediately after rinsing. This is important — if you let the rinse water dry on its own, you’ll get new water spots.
Step 6: Dry with a microfiber cloth
After squeegeeing, do a final wipe with a clean microfiber cloth. This picks up any remaining moisture and gives you that streak-free finish that makes glass actually look clean.
The Track and Frame Problem

The glass itself is one thing, but the metal tracks at the bottom? Those are a nightmare. Soap scum and mildew collect in those channels and most people completely ignore them.
I use an old toothbrush with the vinegar and baking soda paste to scrub inside the tracks. Sometimes I’ll pour straight white vinegar into the channels, let it sit for 15 minutes, and then scrub. For really bad buildup, I’ve found that a cotton coil or paper towels soaked in vinegar and stuffed into the track channels work well — leave them there for 30 minutes and then scrub.
Mistakes I Made That You Should Skip
I tried using a razor blade scraper at one point, thinking it would slice right through the scum. And it sort of did — but it also left hairline scratches in the glass that I only noticed once the light hit them at the right angle. Avoid razor blades on shower glass unless you’re very experienced and using a proper glass scraper tool at the right angle. Even then, it’s risky.
I also made the mistake of using a bleach-based cleaner on soap scum early on. Bleach is great for mold and mildew, but it does almost nothing for mineral-based soap scum. I wasted a lot of time scrubbing with bleach spray wondering why the cloudiness wasn’t going away. Bleach is the wrong tool for this job.
Another mistake: mixing vinegar and baking soda in the same container thinking I was making a super cleaner. What you actually make is a fizzy neutral reaction that mostly cancels both products out. Use them separately — baking soda as a scrub, vinegar as a spray — and they work much better.
How to Keep It From Coming Back
Once your doors are clean, the single best habit you can build is squeegeeing after every shower. Keeps a squeegee hanging inside the shower and use it on the doors before you step out. It takes about 15 seconds and it removes the water and soap residue before it has a chance to dry and start bonding to the glass.
I also started using liquid body wash instead of bar soap in my shower. Bar soap is a significant contributor to soap scum formation because of those fatty acids mentioned earlier. Liquid wash doesn’t create the same type of reaction with hard water minerals. This alone made a noticeable difference over the following weeks.
Some people swear by applying Rain-X to the inside of shower doors — the same product used on car windshields. It creates a hydrophobic coating that causes water to bead up and run off rather than sit on the glass. I’ve tried it, and it does work reasonably well. You have to reapply it every few months, but it genuinely reduces how quickly scum builds up.
When the Scum Has Been There Too Long
Sometimes, especially in a house you’ve just moved into or a bathroom that went uncleaned for a long time, the buildup is severe enough that one cleaning session won’t fix it. I’ve been in this situation with a rental property, and the answer is repetition.
Do the full cleaning routine, rinse, dry — and then do it again two days later. And again a few days after that. Each session removes another layer. After three or four good cleaning sessions over a couple of weeks, even really bad scum usually surrenders.
If you’ve done four or five deep cleans and the glass still looks etched or permanently cloudy, the scum may have actually etched into the glass surface. At that point, you’re looking at a specialty glass polish product (like Cerium Oxide glass polish used for car windshields) or potentially replacing the glass panel.

Final Thoughts
Honestly, cleaning soap scum from glass shower doors isn’t glamorous work, but it’s one of those chores that makes a disproportionately large difference in how your bathroom looks and feels. Clean glass doors genuinely transform a bathroom.
The biggest things I’ve learned: use acid-based products (vinegar), give them time to work, scrub with the right tools, and then squeegee immediately after every shower going forward. That combination handles probably 95% of soap scum situations without needing to buy anything expensive.
Start with the vinegar and Dawn spray, be patient with your dwell time, and you’ll be surprised what a difference it makes.


