How to Clean Shower Doors with Dawn and Vinegar

I used to dread cleaning the bathroom. Not the toilet, not the sink — the shower doors. Those streaky, cloudy, soap-scum-covered glass panels that somehow looked worse after I cleaned them than before. I’d spray some fancy store-bought cleaner, wipe it down, and stand back thinking I was done. Then the light would shift, and boom — white haze, water spots, and a film that made the whole bathroom look grimy no matter how hard I scrubbed.
Then a neighbor mentioned she cleaned her shower doors with nothing but Dawn dish soap and white vinegar. I thought she was messing with me. Seemed too simple, too cheap, too “grandma-ish.” But after spending another Saturday losing a battle with a $12 bottle of “professional-grade” bathroom spray, I gave it a shot.
That was over two years ago. I haven’t bought a shower cleaner since.
Why Shower Doors Get So Disgusting in the First Place
Before we get into the how, it helps to understand the why — because once you do, the Dawn and vinegar combo makes total sense.
What you’re looking at on those doors isn’t just dirt. It’s a combination of hard water minerals (calcium and magnesium deposits), soap scum (the residue left when soap reacts with hard water), body oils, and sometimes even a thin layer of mildew or mold if ventilation isn’t great. These things bond to glass and build up in layers over time. Regular all-purpose cleaners often just clean the surface layer without breaking down those mineral deposits underneath.
That’s where vinegar comes in. It’s mildly acidic, which means it actually dissolves mineral buildup at a chemical level — not just wipes it. And Dawn? That blue dish soap cuts through grease and oils like nothing else. It’s literally designed to break down fats and oils, which is exactly what body soap residue is.
Together, they hit every layer of the problem. That’s why it works so well.
What You’ll Need
You don’t need much, which is one of the things I love about this method.
- White distilled vinegar (the cheap stuff from any grocery store — no need to go fancy)
- Dawn dish soap (the original blue formula is what I use, though other varieties work too)
- A spray bottle
- A non-scratch scrubbing sponge or a microfiber cloth
- A squeegee (optional but highly recommended)
- Warm water
That’s it. Everything probably already in your kitchen or cleaning cabinet.
The Basic Cleaning Method (What I Use)
This is my go-to for regular maintenance cleaning. If your doors aren’t too far gone, this alone will get them sparkling.
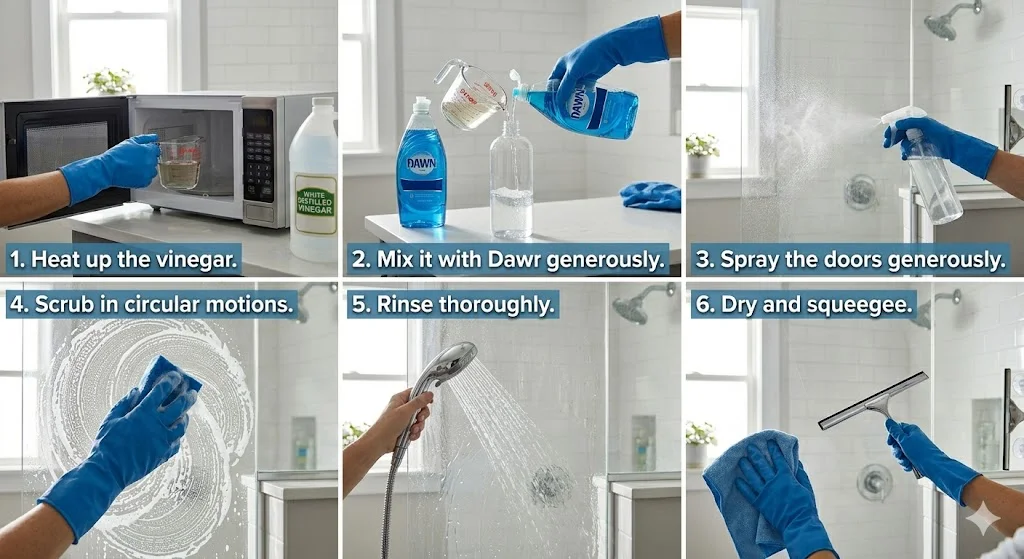
Step 1: Heat up the vinegar.
Pour about one cup of white vinegar into a microwave-safe bowl and heat it for about 90 seconds. Warm vinegar works significantly faster than cold — the heat helps it penetrate and loosen deposits more effectively. Be careful when you take it out because it’ll be hot and the smell hits you immediately. That sharp vinegar scent fades once it dries, I promise.
Step 2: Mix it with Dawn.
Add a few generous squirts of Dawn — maybe a tablespoon or so — into your spray bottle. Then carefully pour the hot vinegar in on top. Give it a gentle swirl to mix. Don’t shake it hard or you’ll end up with a foamy mess everywhere.
Step 3: Spray the doors generously.
Coat the entire glass surface, paying extra attention to the bottom edges and corners where soap scum and mineral deposits tend to collect the most. Don’t be stingy with it. Let the solution sit for at least five to ten minutes. This is the step most people rush, and it’s where most of the actual work happens. The mixture is dissolving the buildup while you stand there doing nothing. Let it do its job.
Step 4: Scrub in circular motions.
Using your non-scratch sponge or a microfiber cloth, scrub the glass in small circular motions. You’ll feel the resistance where buildup is heavier — focus a little extra time on those spots. You should start to see the haze lifting pretty quickly.
Step 5: Rinse thoroughly.
Rinse the doors with warm water until all the soap and vinegar residue is gone. This step matters more than people think. Leftover soap will leave its own residue and you’ll be back to square one.
Step 6: Dry and squeegee.
Wipe down the glass with a dry microfiber cloth, then run a squeegee from top to bottom to pull off any remaining water. This is what gives you that streak-free finish. If you skip this, water spots will form as it air-dries.
For Really Bad Buildup: The Paste Method
Okay, so when I first tried this method, my shower doors had probably six months of neglected soap scum on them. The spray alone wasn’t quite cutting through the really stubborn patches. So I tweaked the approach.
Instead of mixing vinegar and Dawn in a spray bottle, I made a paste.
Take about half a cup of baking soda and mix in enough Dawn to form a thick, spreadable paste — like the consistency of toothpaste. Apply it directly to the stubborn spots on the glass. Then spray white vinegar over the paste. It’ll fizz up (totally normal — that’s the baking soda and vinegar reacting). Let it sit for 10 to 15 minutes, then scrub with your sponge.
The fizzing action combined with the mild abrasiveness of the baking soda and the grease-cutting power of Dawn is genuinely impressive on heavy buildup. I used this method on my doors the first time and was honestly a little stunned by the results. Stains I thought were permanent just lifted right off.
Cleaning the Shower Door Tracks and Frame
This part gets overlooked all the time. The tracks at the bottom of sliding shower doors are their own special nightmare — soap scum and mildew collect in those little channels and it’s hard to reach them.
Pour some undiluted white vinegar directly into the tracks and let it sit for about 15 minutes. Then use an old toothbrush to scrub into the crevices. The vinegar softens the gunk so it comes out pretty easily with a little brushing. Wipe it all out with a damp cloth or a paper towel.
For the metal or plastic frames around the glass, the Dawn and vinegar spray works perfectly fine. Just spray, let it sit, wipe with a cloth, and rinse.
Mistakes I Made Early On (Don’t Do These)

The first time I tried this, I didn’t heat the vinegar and I got impatient with the dwell time. The results were okay but not great, and I thought the method was overhyped. Turns out I was just doing it wrong.
Don’t skip the dwell time. This is genuinely the most common mistake. The solution needs time to break down the mineral deposits. Five minutes minimum, ten is better, fifteen if you haven’t cleaned in a while.
Don’t use a rough or abrasive scrubber. I tried using a steel wool pad once on a particularly stubborn spot. It scratched the glass. Use non-scratch sponges or microfiber cloths only.
Don’t use this method on natural stone tiles nearby. Vinegar is acidic and can damage natural stone like marble or travertine. If your shower has stone surfaces, be careful about overspray. This combo is for glass, ceramic tile, and fiberglass — not stone.
Don’t expect the smell to linger. The vinegar smell is strong while you’re working but dissipates completely once the surface dries and you’ve rinsed it off. Run the bathroom fan during and after, and you’ll barely notice it.
How Often Should You Do This?
Honestly, a light clean with the spray method once a week keeps things in great shape and takes maybe five minutes total. The key is not letting the buildup get out of hand. The heavier the buildup, the harder you have to work.
If you want to extend the time between deep cleans, squeegee the glass after every shower. Takes ten seconds and removes most of the water before it can leave mineral deposits. It’s a habit that’s genuinely changed how my bathroom looks on a daily basis.
A Note on Framed vs. Frameless Doors
I have frameless glass doors now, but I’ve used this method on both framed and frameless. Frameless doors are easier because there are fewer crevices. Framed doors require a bit more attention to the frame and seals, but the cleaning solution works the same way on the glass itself.
If your doors have a protective coating (some newer shower doors come with treated glass), check the manufacturer’s instructions before using vinegar — in rare cases it can affect certain coatings. Most standard glass is totally fine.
Final Thoughts
There’s something genuinely satisfying about spending pennies on ingredients you already own and getting better results than expensive cleaners ever gave you. My shower doors right now are cleaner than they were when I moved in — no exaggeration.
The Dawn and vinegar method works because it’s actually addressing the chemistry of what you’re trying to remove, not just masking it or wiping the surface layer. Once you understand that, it stops feeling like a home remedy and starts feeling like the obvious solution.
Give it one try. Heat the vinegar, be patient with the dwell time, and squeegee at the end. If you don’t see a noticeable difference, I’ll eat my non-scratch sponge.


